
Insulation is a strange affair – lots of effort with nothing to show. Friends admire the kitchen clock, the lights, the flooring. ‘But you should see the insulation,’ I cry. ‘Just pause and you’ll feel it.’
This blog by local resident Judith Leary Joyce tells the tale of insulating their Victorian terrace.
I never thought the day would come, but finally we’re on the last leg of our home retrofit. (See Judith’s earlier blog about the project here. )
In terms of insulation, it took me a while to get my head round what was needed. Here is what I worked out (apologies to any experts reading this): we first had to stop the cold air coming in, and then make the place cosy. (Technical term!)
“We first had to stop the cold air coming in, and then make the place cosy.”
Stopping the draughts
Draughty homes make up 14% of UK emissions so this is serious stuff. Our house was no exception. Built in 1901, we had single brick walls, no cavity to fill, ill-fitting doors and windows – you name it, we had it. Just trying to catalogue it all bent my brain.
Windows
Our Victorian sash windows with secondary glazing were in reasonable shape but draughty, so we refurbished with double-glazed units and held onto the secondary. Then we replaced our ordinary double glazing with Internorm triple-glazed windows and doors – I’ve been teased too much by my Swedish friends to consider anything else! I just love these windows and the feel they give to the place – especially the quiet – but we weren’t totally convinced by the installers, so we borrowed the Thermal Imaging camera from Sustainable St Albans and had a good look. Sure enough, we still had draughts at the junctions. It just needed one small adjustment by the makers and we were done.

Entrance
Our hall and front door are an eco-nightmare – it is essentially a conservatory with a draughty front door and letterbox. The best option was to seal it off with an external double-glazed door between the hall and rest of the house. The Crittall style looked great and kept the warmth in beautifully, but the lack of a ridge for the door to sit in meant there was still a draught. Fortunately, Aluco took on the challenge and now we are fully sealed.

Fireplace
And then there was the draughty old fireplace. It had to go, but dear heaven, that was a tough day! I can tell you that dust and soot from 1901 is dense, smelly and invasive. Walking through the room I couldn’t see a thing – we definitely should have moved out and lived with our daughter during this one! That left us with just one chimney, which we then filled up with insulation – thankfully, a lot less messy.
“We had single brick walls, no cavity to fill, ill-fitting windows and doors – you name it.”
Draughts sorted, but how do we breath?
Leaky houses make for plenty of fresh air, that’s for sure. So what now? We needed fresh air to stop condensation and mould, but we didn’t have space to install a full Mechanical Ventilation Recovery System so we went for single room Heat Recovery Ventilators. As with much of this process, opinions differed: did we need one in each room or since we have a fair bit of open plan would one on each floor be enough? I’m definitely for the ‘belt and braces’ approach – I can’t bear the thought of having to start again – so we’ve gone for one in each room. Big bonus – helps get the washing dry.
Cosy house
Cold draughts sorted, now we needed to retain the gentle warmth created by our Air Source Heat Pump. Just like zipping up a warm jacket to retain body heat, we needed to ‘duvet’ the floor, walls and roof to hold heat in. This is where concrete floors in newer houses struggle – it’s fine as draught-proofing, but it’s very cold and draws heat out of the room.
We could have used the conventional foil covered Celotex/Kingspan insulation. Product specifications show it works very well, more efficiently in fact than anything else for its thickness, but it’s made from petroleum products. We really wanted to do our best by the Earth, so we took advice from Ecological Building Systems and used wood fibre Pavatherm and Isolayer in the floor and walls, and used sheep’s wool in the loft.
“We needed to ‘duvet’ the floor, walls and roof to hold the heat in.”
Insulating external walls
Our carpenter attached a wooded frame to the external walls, which was then filled-in with two layers of Pavatherm, and then Isolayer (eco plaster board) put on top. Thickness between 100mm and 160mm.

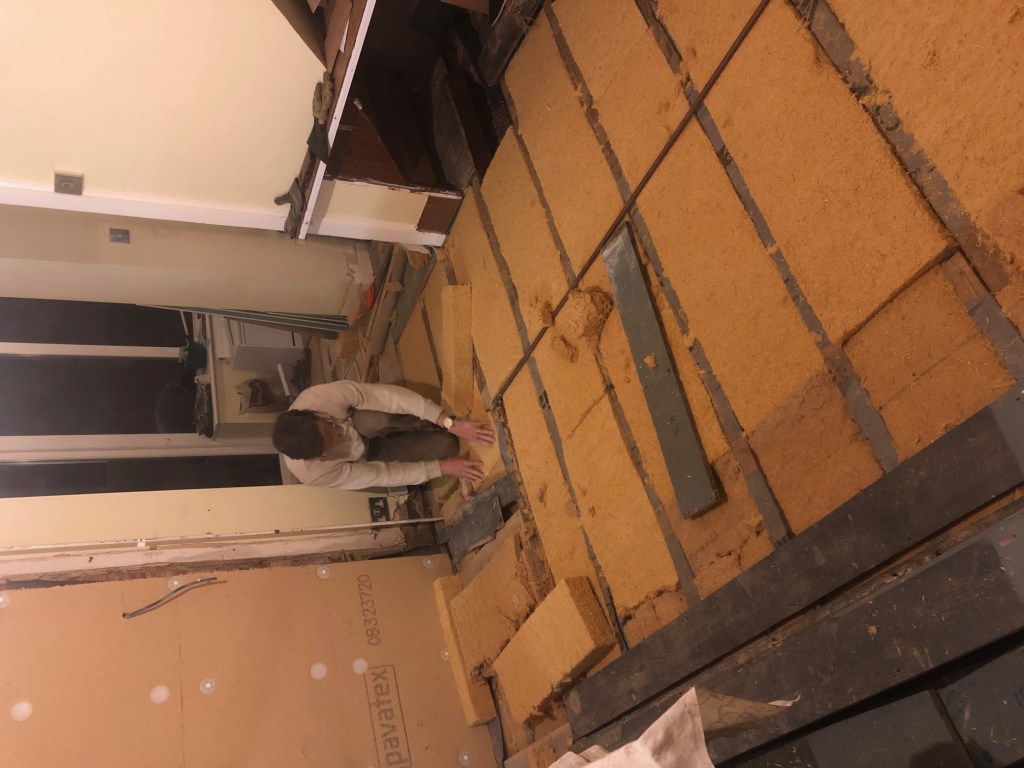
Insulating Floors
Our floors now have 160 mm of Pavatherm between the joists, with the floorboards on top. Where we were installing underfloor heating, we replaced floorboards with Econna Board.
We did the insulation under the floorboards ourselves. I say ‘we’, in fact my husband John did the bulk of it. He worked out a way of suspending a sling of waterproof breathable roofing membrane between the floor joists and filled it with a double layer of Pavaflex, 160 mm thick. Like a giant jigsaw puzzle, we measured each gap, I sawed the ‘bat’ to size and we fitted them into place, plugging any small gaps with offcuts. As we progressed the rooms became quieter and ‘softer’. Finally we added Pro Clima Contega tape between the walls and the floor to cut off any last bits of escaping draught. It was so satisfying, knowing we were creating a warm, cosy room. Whoever thought insulation could be sexy!
Lime plaster
Natural fibres need to breath, so finishing the walls meant lime plaster and eco paint. Easier said than done, I’m afraid – turns out lime plasterers are a rare breed, especially when it comes to a ‘small’ job. The plaster goes on in layers, so there’s lots of coming and going before its ready to be painted. In our case, the kitchen installation was looming and no plasterer in sight. We finally struck lucky by tapping the network. Never mind being six steps from Obama; three steps from a plasterer was far more exciting!
What about insulating the bay window?
We have a traditional Victorian bay window in the front room, so 100mm of Pavaflex was not doable. After hours of googling and asking questions, I found Diathonite, an insulating plaster that can vary in thickness to accommodate strange spaces. Turns out lime plasterers are the people to apply it – of course they are! Although we did discover late in the day that any standard plasterer could do it, if they’re willing to try something new.

A happy insulation ending
It’s finally finished and looking great. Yet again, despite all the hard work, nothing indicates that the wall is anything other than just plastered. But we’ll know – and together with the insulation under the floor we should finally have warm feet this winter!
Favourite insulation memory?
A mercy dash to pick up Pavaflex from a marooned delivery in Northampton. Plumbers were due the next day to lay down Econna Board so the dining room had to be finished. I arrived at the depot with 30 minutes to spare, cold and pretty fed up. But then the person behind the counter asked me where I’d parked my lorry. I felt 10 feet tall! It kept me going through the stormy drive home, our Nissan Leaf overflowing with Pavaflex and the late night of measuring and sawing. We did it in time and of course the plumber was a day late. But never mind all that – I looked like someone who might drive a lorry!

Environmental groups of St Albans District have come together to set up the St Albans Climate Action Network who are hosting their own special St Albans Climate Action Network page. Simply visit the page, explore the 16 steps and pledge to take one step by choosing “Take a Step”. When you register, tick that you are part of the “St Albans Climate Network” to have your step counted on the St Albans page.
Join in today and use the inspiration of Judith’s story to choose the “Insulate Your Home” Step as your pledge.
You can track the carbon impact of your own actions. As more people join, we will all see our cumulative efforts across St Albans, Harpenden and the villages.
We will have a blog every Sunday until the international climate talks in November, COP26. Each blog will focus on one of the 16 steps. Look out for next week’s blog encouraging you to Wear Clothes to Last by Emily Southcombe.
Pingback: Pick one step. Learn about it. Do it (with our help). - Sustainable St Albans
I always wonder about triple glazing, particulaly argon filled – how much energy goes into making it?
Presumably the green option is to stick with existing double glazing if possible and use thick curtains, turn down the heating etc?
Hi
It’s a very nice project and a knowledgeable read. I was wondering if you have any more article on it about the performance and any issues faced afterwards. Will be glad to know and will help a lot.
Thanks
Mahbub hasan khan
Thanks for your message. Judith has written a bit more about the house on her blog http://www.ecorenovationhome.com
With regard to problems: She cannot think of many and they are still working on some of the small adjustments with regard to air tightness, helped by the Thermal imaging camera which shows up where small gaps might be. They have found that the very large radiators recommended with an air source heat pump were not necessary, so we may get rid of at least one of those. Otherwise it’s going very well, both in winter and summer.
She will be opening up the house for Sustfest, so if that would be of interest, keep an eye on the programme. You would need to book in, if you wanted to come.
We are just in the process of applying diathonite throughout our whole house. It’s ended up a minimum 7.5 cm deep but more in places because the stone work is so rough. How have you installed curtain rails? I should have thought of this earlier!
Having Diathonite all the way through must be a messy business – you have my sympathy! But it will all be worth it.
Judith’s husband put up the curtains and said that the Diathonite is very solid and strong so he just screwed into it. He used long screws to make sure it got through the Diathonite and into the brick. He has also put a couple of shelves up onto the Diathonite which seem to be holding fine.